
Here is my preliminary task
1. Who did you work with and how did you manage the task between you?
 |
| Our Group |
When shooting, Laith and Hugh had the acting roles whereas myself and Ayisha were directing and filming. I directed most of the shots and Ayisha filmed them but we worked well together and helped each other to do both. Hugh also had a chance to direct the shots that he wasn't in.
When it came to editing our footage I worked with Ayisha. We split the work equally between us and the changes we made were decided together. Overall I think that our group work well together and there wasn't anyone who didn't contribute or make an effort.
2. How did you plan your sequence? What processes did you use? What theories did you try to take into account?
We used many processes when planning our sequence. The most important processes include:
- Storyboarding
- Writing a script
- Creating a shoot schedule
- Making a top down plan
 |
| Ayisha and I holding our storyboard |
 |
| Script |
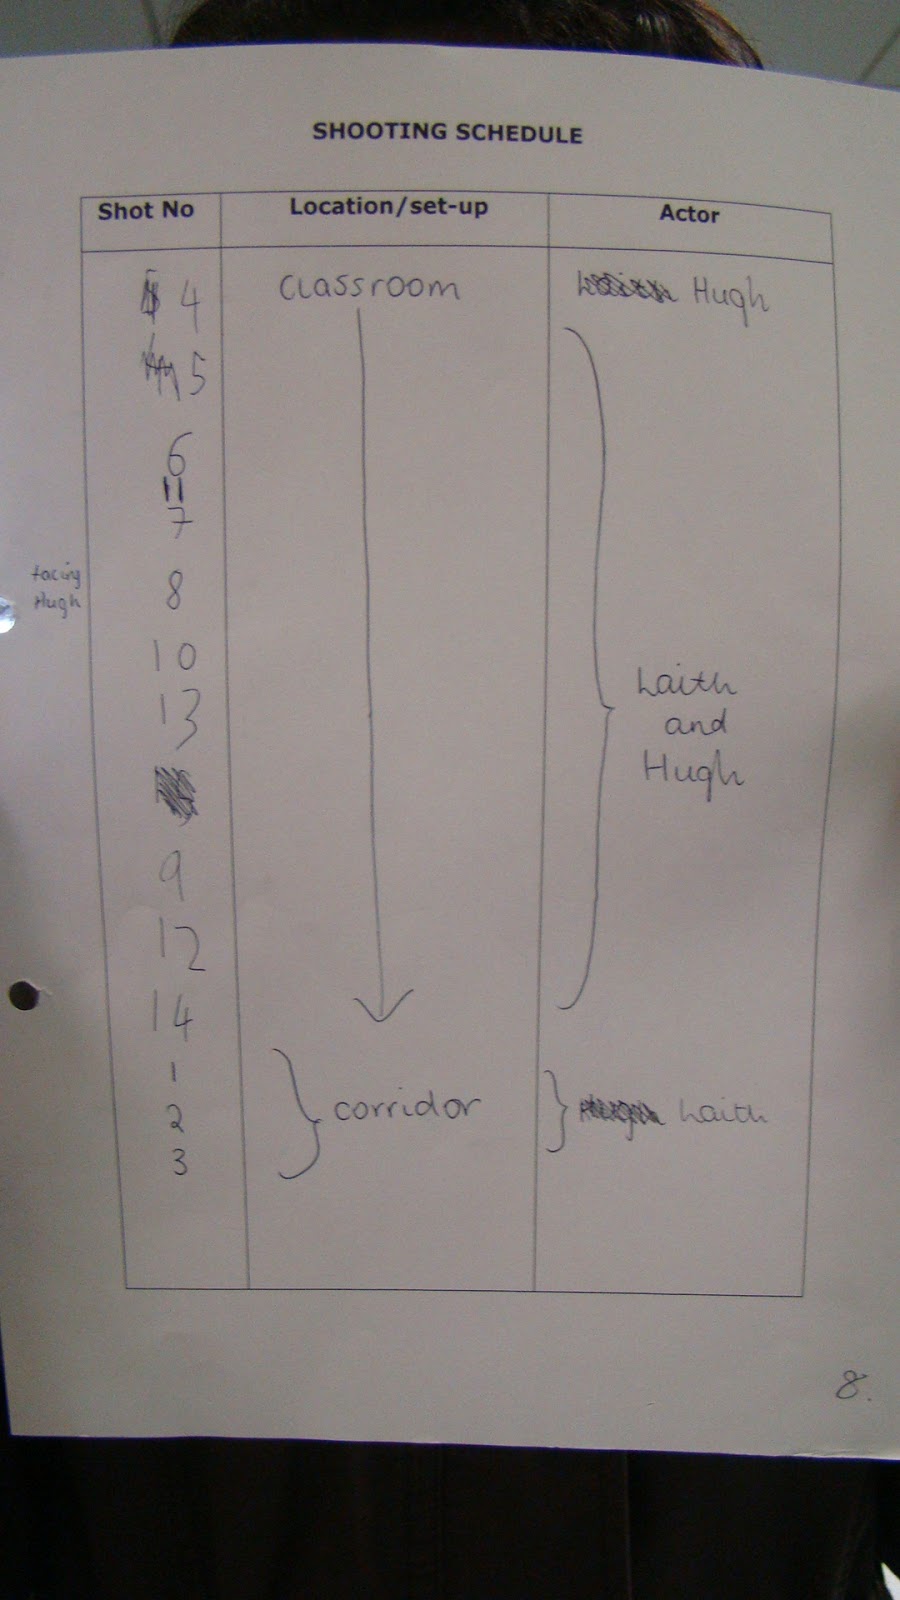 |
| Shoot schedule |
From my perspective, the most important planning process was story-boarding because it was very useful when shooting and editing as it allowed us to see what type of framing was required for each shot and it clearly showed the order of the shots. The shoot schedule helped us to see which shot would require which location and actor. The script was a very important piece of planning as it meant the actors would know what they would say during the sequence.
However, we could have planned the dialogue for each shot better as we didn't know which shots would contain dialogue. This caused us to have to cut out a shot/reverse shot and a two shot as they would have been extremely quick and the dialogue wasn't long enough to cover 8 shots.
The theories that we took into account where the principles of continuity. These include shot/reverse shots, the 180˚ rule and match on action. These three were all a part of the brief so we had to make sure that they were considered in our planning.
Another theory we considered was narrative theory and we had to make sure that the story and dialogue made sense. We also made sure to include a master shot so that the audience can see where everything is in relation to the characters.
Master Shot
Having used all of these planning processes, I have realised how important and useful they are when making a film extract and also how much they help in both production and post-production.
 |
| The camera, tripod, microphone and headphones |
The hardware we used included:
- Canon Legria HFG30 Camera
- Libec TH-650HD Tripod
- Canon DM-100 Directional Microphone
- Headphones
- Computers
The camera had a microphone attached to it and was easy to
use and remove from the tripod. Additionally, the tripod could be adjusted to
change the height and level of the camera, allowing the framing to be accurate.
The camera and tripod were lightweight and easy to move around the classroom. From filming our continuity sequence and photographing our film stills we gained experience using the camera and tripod which made the experience easier.
When editing we used Adobe Premiere Pro as our software. Our
media technician uploaded the footage from the shoot which myself and Ayisha
then renamed. We then proceeded to cut and edit each shot so that the sequence
flows. We used editing tools such as the razor tool (which cuts the footage).
Our computer also had an output monitor which helped us see the sequence
clearly. Ayisha and I didn't have any experience of using
this software before but we found it easy to use and became quite comfortable
with using it during the process. I feel that what took the most time was ensuring all the
clips were snapped together to prevent glitches and making sure they were on
alternate tracks.
 |
| Editing with Adobe Premiere Pro |
 |
Editing our sequence
|
4. What factors did you have to take into account when
planning, shooting and editing?
There were many different factors that we had to take into consideration. These include the location, lighting, props
and costumes that we would need. The timing of the shoot was probably the
biggest factor as we had to plan the shoot so that the filming was completed
within the hour. We had to plan out our props and costumes so that the actors
would have everything they need for the shoot. We also planned out the layout
of the room in a top down plan which made it faster during the shoot as we knew
where everything had to go.
 |
| Our Top Down Plan |
We had to take into consideration the principles of continuity as well in order to meet the brief.
As we were shooting in a school we had to take into consideration the time so that the bell would not be heard in our footage. Also, we were next to the school field so we made sure all the windows were shut so that the sound from outside wouldn't be heard. We also had to plan with the other group as we were sharing space and needed to decide who would be shooting in the corridor first.
Our shoot schedule made filming a lot more organised which saved time and we managed to finish within the time limit.
As I had never used the editing software before, a small amount of time was spent getting used to it. We only had an hour to edit so Ayisha and I made sure all of our footage was on the timeline and ready to edit. We were as organised as possible and tried to use our time well.
5. How successful was your sequence? Please identify what
worked well and, with hindsight, what would you improve/do differently?
I think that our sequence was quite successful. We met the
brief and made sure to include all three principles of continuity.
Shot 8, 9, 10, and 11 show shot/reverse shots. These were
filmed as two shots and then edited to create the shot/reverse shot. We also
have match on action between shot 6 and 7 and also 9 and 10.
We didn’t break the 180˚ rule as we kept the camera
on the same side of both characters so that the audience doesn’t become
confused.
The first match on action shows the teacher holding his hand
out to collect the homework which is followed by a close up of the homework
being passed over, with the teacher’s hand in the same position. The second
match on action shows the teacher ripping up the homework and bringing his arms
back to the centre and placing them on the table followed by a shot from behind
just as his hands touch the table.
We had attempted to match the action between shot 4 and 5 but they were not filmed together and so the character may not be in the correct position as the shot changes. If we were to redo this, I would make sure that these two shots were filmed consecutively and that we repeat the action to make the match more accurate. Additionally, we tried to match the action between shot 1 and 2 but the character is seen to go to open the door with his left end and then opens it with his right. Despite Laith going through the process of walking up to the door again, a different hand was used. If we were to do this shot again, I would make sure to pay a closer attention to which hand is being used to make sure both shots use the same hand.
We had attempted to match the action between shot 4 and 5 but they were not filmed together and so the character may not be in the correct position as the shot changes. If we were to redo this, I would make sure that these two shots were filmed consecutively and that we repeat the action to make the match more accurate. Additionally, we tried to match the action between shot 1 and 2 but the character is seen to go to open the door with his left end and then opens it with his right. Despite Laith going through the process of walking up to the door again, a different hand was used. If we were to do this shot again, I would make sure to pay a closer attention to which hand is being used to make sure both shots use the same hand.
Looking back, we should have started with Laith outside of
the building and walking in so that the narrative makes more sense to the
audience. Despite considering narrative theory, we weren't successful in applying it fully to our sequence as the beginning of our sequence starts with Laith just standing in the corridor which is confusing and unusual.
Also we should
have considered the sound more when filming. We removed the audio from the
start of shot 3 as you could hear the door close in it but the door was still
open in the next shot. If we were to do this again, we could make sure these
two shots are filmed together so that the audio will match the video. When editing we noticed that some of our
clapperboards for certain shots didn’t have the take number on it, which made
it confusing when editing as we weren’t sure which take was which. Next time we know to make sure that the
clapperboard has all the required information on it before each shot.
 |
| A screenshot of our clapperboard without the take number |
6. What have you learnt from completing this task? Looking ahead, how will this learning be significant when completing the rest of your foundation coursework, do you think?
From completing this preliminary task, I have learnt the importance of planning, especially planning how dialogue is involved in different shots as this impacts the editing of the sequence. I have also gained experience in planning a shoot and now know what to do to make the planning and the shoot more organised and successful. On top of this I have learnt how to edit using Adobe Premiere Pro which will be useful when completing our coursework.
Our foundation coursework project will be to produce a 2 minute opening sequence for a fictional film. For the future coursework I believe that the skills I have learnt from this take will be extremely useful as we now have experience in all aspects of production. Having experienced the time it takes to successfully plan a short, 30 second sequence for the preliminary task, I will make sure that in the future our planning time is carefully thought out and structured to make sure everything has been considered and ready for the shoot. It would be important to allocate a longer period of planning to make sure it is all done to a high standard and in enough detail.
I have significantly improved my skills in filming and have learnt a lot from this task. This will help to make sure the filming of our opening sequence is of a high standard and that the framing and movement of the camera is done correctly. Additionally I have improved my directing skills and will make sure each shot has the take number on the clapperboard as the next project will contain many more shots and so this would really help with the organisation and the editing. I also feel that it would be useful to make a record of which take was the most successful when shooting, in order to speed up the editing process and not waste time looking through every take.
Having learnt how to use Adobe Premiere Pro for the preliminary task, I feel that I would be comfortable using it should I need to for the next project. From studying and applying continuity editing I now know what to look for when filming and editing our film opening. I will ensure that the actors follow through the entire movement when filming continuous shots and are consistent when doing match on actions between shots.
Ultimately I have learnt a lot from completing this task and the skills and experience I have gained in pre-production, production and post-production will help towards making a film opening of a high standard.